
How to Rig Your Top Mounted Stage Cylinders in Sidemount Diving
When sidemount was first beginning to gain popularity among cave divers in the late 2000s, many of us experimented with different ways of carrying stage cylinders with a sidemount configuration. Having already done dives in backmount with stage cylinders, that method, carrying the stage cylinder below with the clips connected to the chest and waist D-rings, was the obvious first choice. However, this method detracted from the streamlining offered by a sidemount configuration.
The First Top Mounted Stage Cylinders
Some divers in the High Springs area experimented with mounting stage cylinders on top so that the stage cylinder lay partially above of one of the sidemount cylinders and partially above of the torso. The way these cylinders were connected to the sidemount rig varied from the traditional backmount stage cylinder method. The clips attached to the cylinder with bungee rather than standard stage webbing. The bottom clip attached to the butt plate handle and the top clip attached to the chest D-ring on the same side.
Why the Original Method Didn’t Work
We tried some different methods of doing this. The first was to attempt to bring the top clip and bungee over the shoulder, but that required a bit of flexibility, more than what is required to do valve shut downs in backmount. While that might have worked for thin, young divers, it wasn’t ideal for the majority of divers attempting this method.
The next option was to route the top clip and bungee under the arm. This worked well. It didn’t require as much flexibility and kept the top of the cylinder cinched down close to the diver’s body. The issue with this method was in keeping the bottom of the cylinder from floating up as the gas in that stage cylinder was breathed down.
A Slow Progression
With more experimentation, it was found that stretching the attachment points on the stage cylinder minimized the floating of the bottom of the cylinder, but it did not eliminate it completely. The key to minimizing the bottom float is to position the attachment points so the cylinder is pulled down by the stretched bungee.
Where do you position the worm gear clamp along the body of the stage cylinder? Some people looked for a standard distance for the attachment points, or actually, where to mount the worm gear clamp that holds the bottom clip, but there just isn’t one. The positioning of the attachment points is dependent on the attachment points on the harness. The problem remained. Regardless of where the clip is attached, the bottom of the stage cylinder still becomes positively buoyant and floats up as gas is breathed from it. The shorter the torso, the more of a problem this is because the bottom attachment point has to be farther from the bottom of the cylinder.
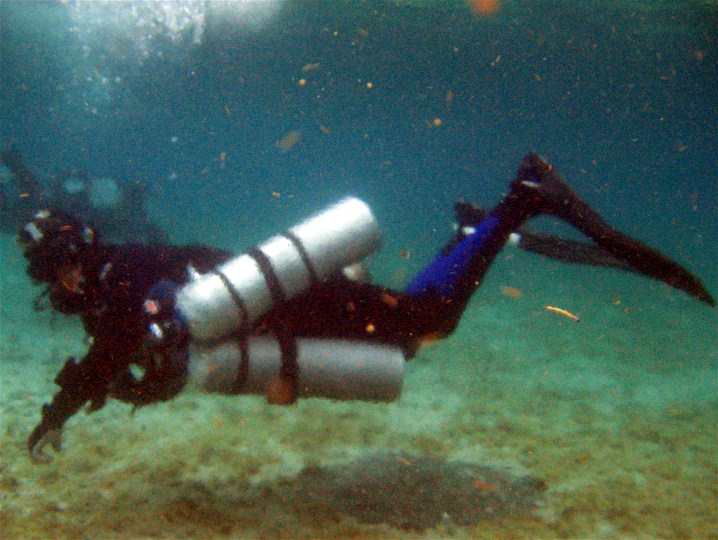
This caused many sidemount divers conducting cave stage dives to carry the stage cylinder on top during the penetration portion of the dive and to clip the cylinder below during the exit portion so the cylinder would rise into the diver rather than onto the ceiling of the cave. This method does work to keep the cylinder off the ceiling, but because the valve and 1st stage are so heavy, the top of the cylinder hangs low.
An option to fix this was to add a second bungee loop to the rig that was used to pull the top of the stage cylinder in close. This is a method I use when doing open ocean decompression dives in which I keep my decompression cylinders with me throughout the dive.
The full configuration system is explained in detail in the book Sidemount Diving: The Almost Comprehensive Guide.
The Solution
Back to top mounting standard bottom mix stage cylinders. I never liked the fact that the bottom of the cylinder became positive and increased the chance for contact with the cave ceiling. While this wasn’t an issue in taller passages, not all passages are tall enough for that. Because an AL80 that is angled off the torso at a 45 degree or more angle isn’t very streamlined, a solution had to be found to correct that
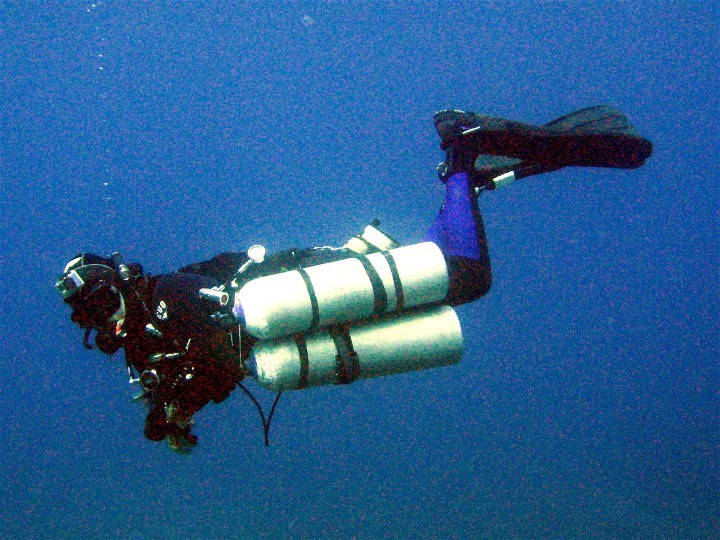
I devised a system that works very well and keeps the cylinder tucked in close and parallel to the body throughout the entire dive regardless of the amount of gas in the cylinder. This system even allows stage cylinders to remain in place while negotiating some restrictions. Only the smallest of the restrictions will require the stage cylinder to be removed and pushed through first.
The problem with the original sidemount stage configuration was that the bottom clip attached to the back of the sidemount rig. As long as the attachment point was on the back, the cylinder could rise up. Moving that attachment point to the front of the harness solved that issue. A longer bungee is required, and other modifications must be made, but the system works well.
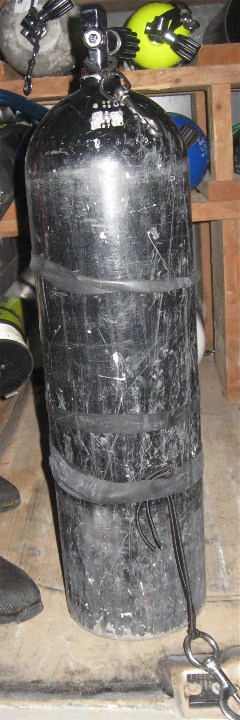
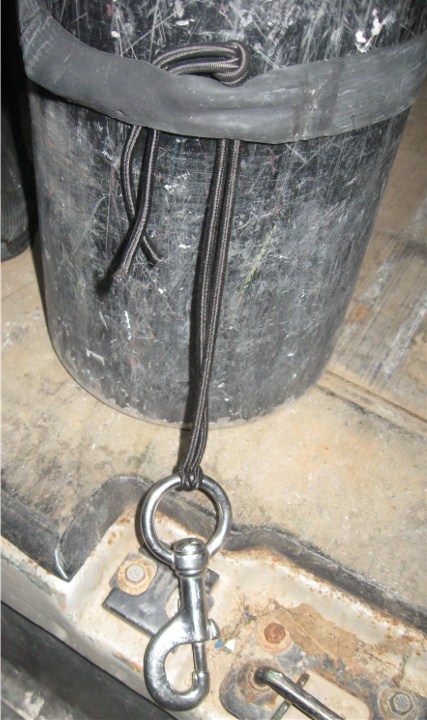
These changes also require learning new skills to become proficient in it. The long bungee along the body of the cylinder must be routed between the sidemount cylinder and your hip so it can get to the attachment point on the front of the harness.
Most sidemount divers use a bungee about 8 inches/20 cm in length. This is a place to start. It may need to be longer or shorter. The goal is to make the cylinder rest on you correctly. The determining factors will be your waist size, your sidemount cylinder size, and the location of the D-ring on your waist strap. You want the bungee to stretch as tight as it can but still make it easy to clip and unclip from the D-ring. When the bungees are the correct length, the stage cylinder rests on top of the sidemount cylinder and the bottom will not rise up regardless of cylinder pressure.
Potential Issues
What if the cylinder starts to rise with this method? Either the worm gear clamp is incorrectly positioned on the stage cylinder or the bungee is too long.
What if the stage cylinder rolls off the side of the sidemount cylinder? The bungee is either too long or your attachment points on the harness are not in the optimal location.
Decompression Cylinders
One thing that should not be done is stage a decompression cylinder on top. A standard stage cylinder is usually used at the beginning of the cave dive, so as you are attaching the stage to your rig you already have the 2nd stage regulator in your hand and have followed the hose back to the cylinder and confirmed gas and maximum operating depth (MOD). Once the cylinder is mounted on top, it is impossible for most to perform that confirmation of gas without taking the cylinder off.
Most decompression cylinders are smaller diameter aluminum 40 cf / 5 L. Taking these cylinders and mounting them below and using an additional bungee to bring them in closer allows for the proper procedure in gas switches and keeps them streamlined.
Final Thoughts
I’ve done thousands of dives with this configuration since I developed it. It is easy to put on and take off and keeps your rig streamlined throughout the entire dive. There is no reason to move the stage cylinder in front of you halfway through the dive and the bottom of the cylinder will not hit the ceiling.
The left cylinder will sit a little lower with the stage cylinder mounted on top of it. This is expected and acceptable. With a stage cylinder, your profile is higher from bottom to top. It doesn’t matter whether that extra profile is below you or above you, it will be there either way.
Readers of this article can receive $10 off the book Sidemount Diving when purchasing directly from the website.
Use code STAGE10 during checkout.
Here’s a short video clip of me taking the stage bottle off and putting it back on during an actual dive in Twin Cave.
Related Articles
How to Choose Sidemount Cylinders
How to Properly Manage Gas in Your Cylinders
How to Choose Proper Hose Lengths
Sidemount Cylinder Rigging: What Matters Most
Sidemount Stage Rigging for Cave Diving
Common Modifications of the Dive Rite Nomad
For a complete overview of how these elements work together, see The Complete Guide to Sidemount Diving Configuration.